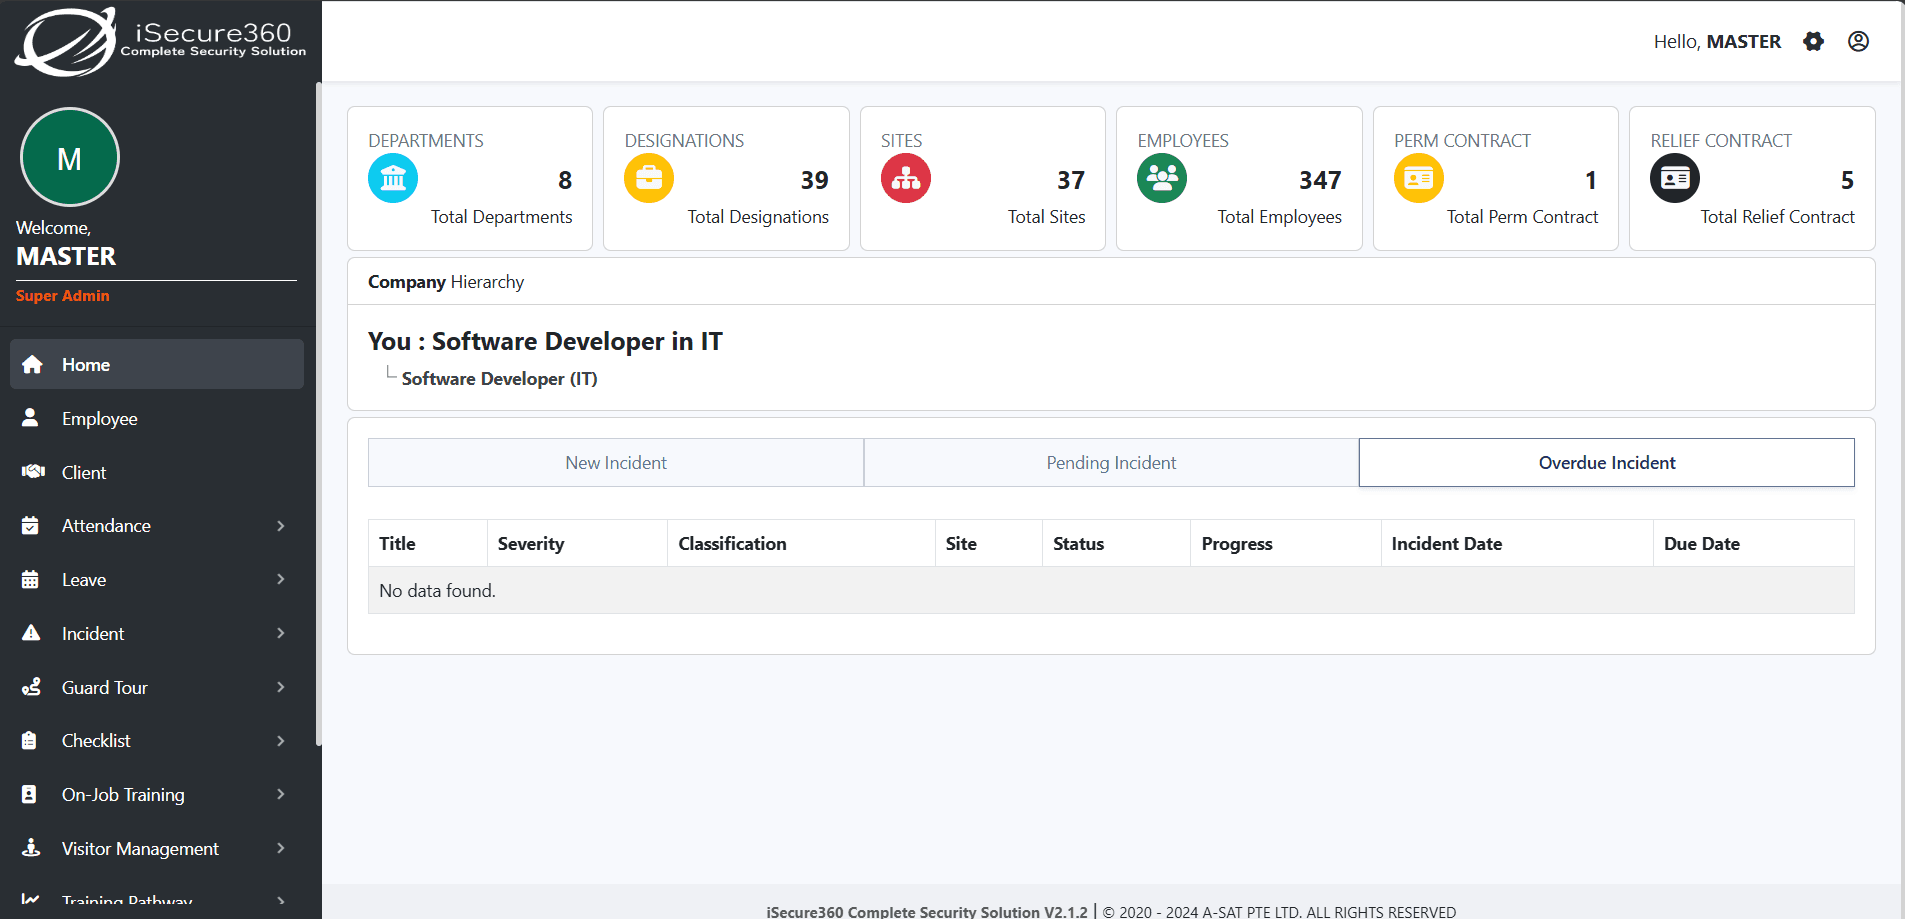
iSecure360
iSecure360 simplifies security workforce and operations management with an intuitive interface, available on both mobile and web platforms. Its multi-tenant setup ensures isolated data for each client while maintaining a single codebase for efficient maintenance.
Overview
iSecure360 is a comprehensive security management platform designed to streamline guard attendance, patrol monitoring, incident reporting, and visitor tracking. It replaces manual logbooks with real-time insights, automated workflows, and customizable reports—empowering organizations to improve safety, compliance, and operational efficiency. With both web and mobile support, iSecure360 ensures seamless communication and accountability across security teams.
Key Achievements
- Deployed across multiple client sites with 500+ active security staff managed daily
- Reduced incident reporting time by 40% through real-time mobile app submissions
- Enabled offline guard tour logging with auto-sync, ensuring 100% data accuracy even in low-connectivity environments
- Improved visitor management efficiency by 60% using QR-based check-in and pre-registration workflows
iSecure360: Multi-Tenant Security Solution with Laravel
iSecure360 is a comprehensive security management application designed to protect businesses, institutions, and homes. Built on the Laravel framework, it supports a multi-tenant architecture, allowing multiple subdomains (e.g., client1.example.com, client2.example.com) to share a single codebase while using separate databases. This guide covers the deployment, multi-subdomain hosting, and tenant management for iSecure360 on an Ubuntu server with Nginx and MariaDB.
📖 Overview
iSecure360 simplifies security management with an intuitive interface, available on both mobile and web platforms. Its multi-tenant setup enables isolated data for each client (tenant) while maintaining a single codebase for efficient maintenance.
🚀 Key Features
🛠️ Server Requirements
To deploy iSecure360, ensure your server meets the following requirements:
| Requirement | Details |
|---|---|
| PHP | >= 8.1 |
| PHP Extensions | Ctype, cURL, DOM, Fileinfo, Filter, Hash, Mbstring, OpenSSL, PCRE, PDO, Session, Tokenizer, XML, MySQL, Zip, Unzip, JSON, BCMath, GD |
| Database | MariaDB (MySQL-compatible) |
| Web Server | Nginx |
| Composer | Required for dependency management |
📦 Installation and Setup
Follow these steps to set up iSecure360 with multi-tenant support on an Ubuntu server.
1. Install PHP and Extensions
Add the ppa:ondrej/php repository and install required PHP extensions.
sudo add-apt-repository ppa:ondrej/php
sudo apt update
sudo apt install php-fpm php-mysql php-mbstring php-zip unzip php-json php-bcmath php-gd php-tokenizer php-xml
Note: The zip and unzip extensions are required for Composer, and php-mysql enables MariaDB connectivity.
2. Install Composer Dependencies
Install the application’s Composer dependencies, optimized for production.
composer install --optimize-autoloader --no-dev
composer update
Explanation:
--optimize-autoloader: Enhances performance.--no-dev: Excludes development dependencies.3. Configure the `.env` File
Set up environment-specific configurations.
cp .env.example .env
php artisan key:generate
Steps:
.env.example to .env.APP_KEY..env with database credentials (central database and tenant databases).4. Set Directory Permissions
Ensure the storage and bootstrap/cache directories are writable by the web server user (www-data).
chown -R www-data:www-data .
chown -R www-data:www-data storage bootstrap/cache
chmod -R 775 storage
chmod -R 775 bootstrap/cache
5. Install and Configure MariaDB
Install MariaDB for the central and tenant databases.
sudo apt update
sudo apt install mariadb-server
sudo systemctl start mysql
Secure the MariaDB installation:
sudo mysql_secure_installation
Prompt Responses:
No.Yes.Yes.Yes.Yes.6. Create a Database User
Create a MySQL user for the central database and grant privileges.
sudo mysql -u root
CREATE USER 'isecure360'@'localhost' IDENTIFIED BY 'your-password-here';
GRANT ALL PRIVILEGES ON isecure360_central.* TO 'isecure360'@'localhost';
FLUSH PRIVILEGES;
EXIT;
Note: Update the .env file with these credentials for the central database.
🏢 Multi-Subdomain Hosting Setup
iSecure360 uses a single Laravel codebase to serve multiple subdomains, each with a separate database. This section outlines two approaches: hardcoded mapping and database-driven tenant management.
Solution 1: Hardcoded Subdomain-to-Database Mapping
Step 1: Configure Database in `config/database.php`
Set up a default MySQL connection with dynamic overrides.
// config/database.php
'mysql' => [
    'driver' => 'mysql',
    'host' => env('DB_HOST', '127.0.0.1'),
    'port' => env('DB_PORT', '3306'),
    'database' => env('DB_DATABASE', 'isecure360_central'),
    'username' => env('DB_USERNAME', 'isecure360'),
    'password' => env('DB_PASSWORD', ''),
    'unix_socket' => env('DB_SOCKET', ''),
    'charset' => 'utf8mb4',
    'collation' => 'utf8mb4_unicode_ci',
    'prefix' => '',
    'strict' => true,
    'engine' => null,
],
Step 2: Dynamically Switch Database in `app/Providers/AppServiceProvider.php`
Switch the database based on the subdomain.
// app/Providers/AppServiceProvider.php
use IlluminateSupportFacadesDB;
use IlluminateSupportFacadesConfig;

public function boot()
{
    $host = request()->getHost(); // e.g., client1.example.com
    $subdomain = explode('.', $host)[0]; // e.g., client1

    $databases = [
        'client1' => 'isecure360_client1',
        'client2' => 'isecure360_client2',
        'client3' => 'isecure360_client3',
    ];

    if (array_key_exists($subdomain, $databases)) {
        Config::set('database.connections.mysql.database', $databases[$subdomain]);
        DB::purge('mysql');
        DB::reconnect('mysql');
    }
}
Step 3: Configure Nginx for Subdomains
Create an Nginx configuration in /etc/nginx/sites-available/isecure360 to handle multiple subdomains.
server {
    listen 80;
    listen [::]:80;
    server_name example.com client1.example.com client2.example.com client3.example.com;
    root /srv/isecure360/public;

    access_log /var/log/nginx/isecure360.access.log;
    error_log /var/log/nginx/isecure360.error.log;

    add_header X-Frame-Options "SAMEORIGIN";
    add_header X-Content-Type-Options "nosniff";

    index index.php;

    charset utf-8;

    location / {
        try_files $uri $uri/ /index.php?$query_string;
    }

    location = /favicon.ico { access_log off; log_not_found off; }
    location = /robots.txt  { access_log off; log_not_found off; }

    error_page 404 /index.php;

    location ~ .php$ {
        fastcgi_pass unix:/var/run/php/php8.1-fpm.sock;
        fastcgi_param SCRIPT_FILENAME $realpath_root$fastcgi_script_name;
        include fastcgi_params;
    }

    location ~ /.(?!well-known).* {
        deny all;
    }
}
sudo ln -s /etc/nginx/sites-available/isecure360 /etc/nginx/sites-enabled
sudo nginx -t
sudo systemctl restart nginx
Solution 2: Database-Driven Tenant Management
Step 1: Configure Database in `config/database.php` - Solution 2
Use the same configuration as in Solution 1 (see above).
Step 2: Create a `tenants` Table
Create a migration for the tenants table to store tenant metadata.
php artisan make:migration create_tenants_table
// database/migrations/xxxx_xx_xx_create_tenants_table.php
use IlluminateDatabaseMigrationsMigration;
use IlluminateDatabaseSchemaBlueprint;
use IlluminateSupportFacadesSchema;

return new class extends Migration {
    public function up(): void
    {
        Schema::create('tenants', function (Blueprint $table) {
            $table->id();
            $table->string('subdomain')->unique(); // e.g., client1
            $table->string('db_name'); // e.g., isecure360_client1
            $table->string('db_username');
            $table->string('db_password');
            $table->timestamps();
        });
    }

    public function down(): void
    {
        Schema::dropIfExists('tenants');
    }
};
Step 3: Seed the `tenants` Table (Optional)
Create a seeder for initial tenant data.
php artisan make:seeder TenantSeeder
// database/seeders/TenantSeeder.php
use IlluminateDatabaseSeeder;
use IlluminateSupportFacadesDB;

class TenantSeeder extends Seeder
{
    public function run(): void
    {
        DB::table('tenants')->insert([
            ['subdomain' => 'client1', 'db_name' => 'isecure360_client1', 'db_username' => 'client1_user', 'db_password' => 'secret1'],
            ['subdomain' => 'client2', 'db_name' => 'isecure360_client2', 'db_username' => 'client2_user', 'db_password' => 'secret2'],
            ['subdomain' => 'client3', 'db_name' => 'isecure360_client3', 'db_username' => 'client3_user', 'db_password' => 'secret3'],
        ]);
    }
}
Run migrations and seeders:
php artisan migrate --seed
Step 4: Dynamically Switch Database in `app/Providers/AppServiceProvider.php`
Use the tenants table to switch databases.
// app/Providers/AppServiceProvider.php
use IlluminateSupportFacadesDB;
use IlluminateSupportFacadesConfig;
use AppModelsTenant;

public function boot()
{
    $host = request()->getHost();
    $subdomain = explode('.', $host)[0];

    $tenant = Tenant::where('subdomain', $subdomain)->first();

    if ($tenant) {
        Config::set('database.connections.mysql.database', $tenant->db_name);
        Config::set('database.connections.mysql.username', $tenant->db_username);
        Config::set('database.connections.mysql.password', $tenant->db_password);
        DB::purge('mysql');
        DB::reconnect('mysql');
    }
}
Step 5: Configure Nginx for Subdomains
Use the same Nginx configuration as in Solution 1 (see above).
Step 6: Clear Config Cache
Ensure configuration changes take effect.
php artisan config:clear
php artisan cache:clear
🧑💼 Tenant Management Commands
Manage tenants using custom Artisan commands.
1. Create Central Database
Initialize the central database for tenant metadata.
php artisan db:create isecure360_central

php artisan migrate --path=database/migrations/central
2. Create Tenant
Create a new tenant with a dedicated database.
php artisan tenant:create <subdomain> <database>
Example:
php artisan tenant:create client1 isecure360_client1
Description:
subdomain.database.3. Migrate Tenants
Run migrations for tenant databases.
| Command | Description |
|---|---|
php artisan tenant:migrate | Migrates all tenant databases. |
php artisan tenant:migrate | Migrates a specific tenant’s database. |
php artisan tenant:migrate --fresh | Drops and recreates all tenant databases, then migrates. |
php artisan tenant:migrate | Drops and recreates a specific tenant’s database, then migrates. |
Examples:
php artisan tenant:migrate
php artisan tenant:migrate client1
php artisan tenant:migrate --fresh
php artisan tenant:migrate client1 --fresh
4. Migrate and Seed Tenants
Run migrations and seed tenant databases.
| Command | Description |
|---|---|
php artisan tenant:migrate --seed | Migrates and seeds all tenants with the default seeder. |
php artisan tenant:migrate | Migrates and seeds a specific tenant with the default seeder. |
php artisan tenant:migrate --seed --seeder= | Migrates and seeds all tenants with a specific seeder. |
php artisan tenant:migrate | Migrates and seeds a specific tenant with a specific seeder. |
Examples:
php artisan tenant:migrate --seed
php artisan tenant:migrate client1 --seed
php artisan tenant:migrate --seed --seeder=TenantUserSeeder
php artisan tenant:migrate client1 --seed --seeder=TenantUserSeeder
🔒 SSL Configuration with Certbot
Secure subdomains with SSL certificates.
sudo apt install python3-certbot-nginx
sudo certbot --nginx -d example.com -d client1.example.com -d client2.example.com -d client3.example.com
Prompts:
Y).N).Expected Output:
Congratulations! You have successfully enabled https://example.com, https://client1.example.com, ...
Notes:
/etc/letsencrypt/live/example.com/.certbot renew.⏰ Schedule Laravel Commands
Automate scheduled tasks using a cron job.
crontab -e
Add:
* * * * * cd /srv/isecure360 && php artisan schedule:run >> /dev/null 2>&1
Note: Replace /srv/isecure360 with your application’s path.
🔍 Notes
isecure360_client1) exists and is accessible by the specified user..env file and back up /etc/letsencrypt and databases regularly.www-data) to avoid permission issues.